


How to Build a Privacy Fence: A Step-by-Step DIY Guide
 A privacy fence offers clear benefits—greater security, more seclusion, and a cleaner boundary between properties.
A well-planned wood privacy fence also enhances the look of your yard or patio while boosting overall home value.
In this article, we go over everything you need to know to be able to build the best privacy fence for your needs.
NOTE: Before you begin, review local regulations and make sure your layout respects the property line.
VIDEO: If you're looking for more tips and tricks on how to achieve the best privacy fence for your needs, you can check out the video below.
Planning Your Privacy Fence
Planning your privacy fence is the first and most important step.
It ensures your project follows local rules, avoids boundary issues, and suits your yard’s layout and purpose.
Assessing Property Lines
Start by confirming where your property line is. This step prevents future conflicts with neighbors and keeps your privacy fence within legal limits.
Relying on guesses or old markers can result in costly mistakes. Instead, check your property survey or contact a local land surveyor to verify the exact boundaries.
If your yard borders a shared space or if you live in an HOA-managed community, it is especially important to plan carefully. Clear boundary knowledge also makes it easier to measure and mark your layout with a string tied between points.
For more guidance on saving time and money in HOA zones, review how post guards can reduce landscape maintenance fees.
Once your lines are confirmed, you can confidently move forward with post hole placement, knowing that each fence post is in the right spot.
NOTE: our guide on property boundaries and the law explains what you need to check before installing your fence.
Obtaining Necessary Permits
After confirming property boundaries, the next step is to check local regulations. Most cities and towns require a fence permit before you dig post holes or install panels.
These rules often limit fence height, design, and how close it can be to a road, sidewalk, or neighboring property. Failing to follow them can lead to fines or removal orders.
Even if you are building a DIY privacy fence, it is essential to understand your municipality’s guidelines. Some locations also require specific materials, such as treated wood or pressure-treated lumber, to ensure safety and uniformity.
NOTE: If you are replacing a wood fence, you may also need to remove existing posts. Tools like the Mr. Fence Big Red Post Puller help lift old posts out of the ground quickly and safely, allowing you to save effort and protect the surrounding soil.
Design Considerations
Design choices have a direct impact on both function and appearance. Start by deciding how tall your fence needs to be. A taller wood privacy fence improves seclusion and security, especially around a patio, pool, or backyard.
Next, choose materials that fit your budget and goals. Pressure-treated wood and treated lumber are popular for their durability and resistance to decay.
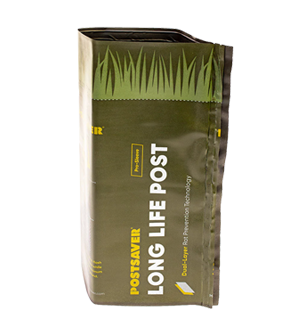
To extend the lifespan of your new fence even further, consider using post-saver rot barriers at the base of each post. These sleeves help protect against ground-level rot and moisture damage.
Aesthetics also matter. Consider how the fence looks from both sides, especially if you share a boundary with neighbors. Designs with clean lines, matching rails, and evenly spaced pickets offer a polished look.
For more inspiration on layout options and privacy fence ideas, explore our backyard fence guide. It provides helpful examples to match your project with your house and garden setup.
With smart design planning, your fence will not only protect your space but also improve the overall look and value of your property.
NOTE: for those managing fencing projects in shared spaces or communities, there are smart ways to manage expenses. See how HOAs and property managers can cut costs on fencing without sacrificing quality.
Tools and Materials Needed
Using the right tools and materials makes your privacy fence project easier, safer, and more efficient.
Here is what you need before starting:
Essential Tools
-
Post hole digger or auger – Digs deep, even post holes for setting fence posts securely.
-
Level – Ensures each post and fence panel is straight and properly aligned.
-
Tape measure – Helps measure distances between posts and across the property line.
-
String line and stakes – Used to mark a straight fence line before digging.
-
Shovel – Useful for clearing soil and adjusting the shape of post holes.
-
Wrench set – Tightens bolts, gate hardware, and other fence components.
-
Hacksaw or pipe cutter – Cuts metal fence parts or trims material during installation.
-
Rubber mallet – Helps gently tap parts into place without damaging them.
-
Fence puller – Tensions the fence properly during installation.
For easier framing, the Squi.Jig 1.5” framing jig can also assist in achieving perfect alignment.
Materials
-
Wooden fence panels or pickets – Form the main barrier for your wood privacy fence.
-
Fence posts (typically 4x4 treated lumber) – Provide vertical support; use treated wood to resist rot and insects. Add post guards for extra protection at ground level.
-
Concrete mix – Secures posts in place, keeping them upright and stable.
-
Galvanized nails or screws – Fasteners that resist rust and hold fence panels, rails, and pickets together.
-
Gate hardware (hinges, latch) – Necessary for building a functional entry point in your privacy fence.
To preserve and enhance your wood, consider applying semi-transparent deck stain after installation using specialized wood fence tools for cleaner, faster results. For a finished look, top each post with matching post caps or finials.
Furthermore, if your design includes railings aluminum balusters and connectors may also be used for additional support.
Step-by-Step Installation Guide
 Building a wood privacy fence takes careful planning and execution.
Follow these steps to complete the project efficiently and create a strong, long-lasting fence that adds privacy and structure to your yard.
1. Marking and Preparing the Site
Begin by outlining the layout of your fence using a string line. Tie the string tightly between stakes at both ends of the planned fence line.
Keep the string level, as this will guide post placement and help you maintain a straight, uniform layout throughout your project.
Next, mark the positions of each fence post. Most fence posts are spaced 6 to 8 feet apart, depending on the size of your fence panels or pickets. Consistent spacing helps with stability and makes attaching panels easier.
Lastly, make adjustments near corners, gates, or structures to maintain balance and visual appeal. These early steps are essential for keeping everything in line as you move into installation.
2. Digging Post Holes
Once your site is marked, begin digging the post holes at each marked spot.
Use a post hole digger or auger for efficiency. Terminal posts—those at corners and end—should have deeper, wider holes to support more weight.
Aim for 6 to 8 inches in diameter and about 30 inches deep. Line posts can be slightly narrower, around 4 to 6 inches wide.
As a rule of thumb, bury about one-third of the total post length for solid support. This keeps the posts stable against wind and soil movement. Digging deeper may also be necessary in areas with soft or sandy soil.
Remove any loose soil at the bottom to create a solid base. All these adjustments help ensure your new fence stands straight and holds up over time.
3. Setting the Posts
With holes ready, place one post at a time into the ground. Use a level to ensure each post is plumb on all sides. Align the posts with your string line to maintain a consistent layout.
Take your time during this step, as misaligned posts can affect the entire fence.
Pour concrete mix into the hole around the post. Fill slowly and re-check the alignment as you go. Once the hole is full, slope the top of the concrete slightly away from the post to shed water.
Let the concrete cure for 24 to 48 hours before moving on.
For added durability and a cleaner appearance at ground level, use post guards. You can also apply wood care treatments or stain using a stain machine to protect posts from rot and moisture before attaching panels.
4. Attaching the Fence Panels or Pickets
After the concrete has cured, begin attaching the panels or pickets. Start at one corner or end of the fence line.
Align the first panel or picket carefully, making sure it is level and evenly spaced from the ground. If you are working with individual pickets, use spacers to keep gaps consistent.
Secure the panels or pickets to the posts using galvanized nails or screws. These fasteners resist rust and provide long-term strength. As you move down the fence line, double-check that each section aligns with the previous one.
This step-by-step approach helps maintain a clean, professional look. If you plan to stain your fence later, check out Fence Armor’s line of fence staining equipment for tools that make the job easier and more effective.
5. Installing the Gate
The final step is to install the gate. Choose a location that allows for easy access in and out of the yard.
Gate posts should be set with extra care—they carry more weight and motion than standard posts. Make sure the spacing matches the gate width, allowing clearance for hinges and a latch.
Install the gate hinges first, attaching them to the gate frame. Then fasten the hinges to the gate posts, checking that the gate opens and closes smoothly. Finally, install the latch and test the full swing.
Adjust as needed to ensure the gate hangs straight and remains secure when closed. When properly installed, your gate should blend seamlessly with the rest of the privacy fence, offering convenience, security, and curb appeal.
Maintenance Tips for Longevity
Keeping your wood privacy fence in good condition requires simple but consistent upkeep. Start with regular inspections.
Walk along the fence to check for loose screws, cracked boards, or signs of rot. Tighten any hardware and replace damaged sections as needed to avoid further issues.
Cleaning the fence also helps. Use a garden hose or soft pressure washer to remove soil, algae, or buildup that can lead to decay over time. Just be sure to clear debris from the base to prevent moisture damage.
To extend the life of your wood fence, apply a quality stain or sealant every few years. For faster results on large projects, consider using a staining machine.
Furthermore, if your fence includes mixed materials, explore options for chain link protection to keep everything reinforced and looking clean.
Frequently Asked Questions
Here are clear answers to common questions about building and maintaining a privacy fence.
What Is the Cheapest Way to Build a Privacy Fence?
Utilize pressure-treated wood for the frame and consider using reclaimed materials or budget-friendly panels to reduce costs.
Pressure-treated wood offers durability at a lower price point compared to other materials.
Using recycled boards or discounted pickets can also help keep the overall project cost within the budget.
How Do You Install Fence Posts in the Ground?
Dig holes to the appropriate depth, place posts in the holes, and secure them with concrete or gravel.
Make sure each hole is wide enough and deep enough to support the post. Use a level to keep the post straight before filling and compacting the material around it.
How Do You Cut Chain Link Fence?
Use a hacksaw or pipe cutter to cut the chain link fabric, ensuring clean cuts to avoid injury. Furthermore, wear gloves to protect your hands during the process.
Afterward, cut along one wire at a time for better control and smoother results. This method helps maintain the shape and strength of the remaining material.
Key Takeaways on How to Build a Privacy Fence
Building a privacy fence requires clear planning, the right tools, and attention to detail at every stage.
From marking the layout and setting posts to securing panels and finishing with proper maintenance, each step plays a key role in the final result.
With patience and a step-by-step approach, you can complete the project confidently and with lasting results. Whether you are enhancing your yard, improving security, or creating a quiet retreat, the process is manageable with the right preparation.
For more products, guides, and fence protection solutions, browse through Fence Armor and explore the tools designed to help you build better.
Here are some essential tools and accessories that can help enhance every part of your fencing project:
Fence Post Guard | Post Saver Sleeve | Speed Square | Mr Fence Tools | Semi Transparent Stain | Chain Link Fence Bottom Guard | Stain Stripper | Mr Fence Protector | Fence Post Sleeve | Decorative Fence Post Caps | Fence Finials | Vinyl Fence Rail Removal Tool | Fence Protector | Mailbox Post Protector | Fence Hangers | Fence Stains | Semi Solid Deck Stain | Fence Guard | Fence Post Protector | Post Protector 4x4 | Post Preserver | Metal Fence Trim | Fence Buddy | Post Skirt